
Microsoft Azure is one of the big three public cloud computing providers for services such as virtual machines (VMs), containers, server-less computing, and machine learning. Azure is a large platform, but we’re focused solely on the Infrastructure as a Service (IaaS) resources in this guide.
The GNS3 architecture is comprised of three primary components: User Interface (UI), Controller, and the (Compute) Server. The Server is the component that puts a strain on computer hardware resources. The more routers, switches, firewalls, and servers we add to our GNS3 topologies, the more CPU, RAM, and data storage we require. We usually come to a point where the hardware requirements of our GNS3 labs may exceed what our laptops and desktops can deliver.
Public cloud providers and GNS3 complement each other. We require ever-increasing computing resources to run our labs, and they rent it out by the minute (or even second).
Highlights
Nested Virtualization in Azure
Microsoft has recently offered nested virtualization support for the Azure Hypervisor. In addition to Hyper-V, KVM also performs splendidly as a Level 2 (L2) guest. This is excellent news for GNS3 users as most modern virtual network appliances require KVM.
Deployment with Terraform and Ansible
GNS3 server, QEMU (with KVM), Dynamips, VPCS, and Docker automagically installed and configured in about 10 minutes on the latest Ubuntu Server 20.04 LTS release. How does that sound?
Simple and secure WireGuard VPN connection to remote gns3server
WireGuard is a simple yet fast and modern VPN that utilizes state-of-the-art cryptography. WireGuard aims to be as easy to configure and deploy as SSH. A VPN connection is made by exchanging public keys – precisely like exchanging SSH keys – and WireGuard transparently handles the rest.

Dynamic DNS (DDNS)
Our VM instance is allocated a Public IP address . A public IP address remains attached to a VM instance only until the VM is stopped-deallocated or deleted. When a stopped-deallocated instance is started again, a new public IP address is assigned to the instance. Microsoft charges you when the address is attached to a running VM instance. There is no charge when the instance is in the stopped-deallocated state. Instead of modifying the WireGuard client configuration every time the VM instance is started, our method is to link the public IP address with Dynamic DNS .
Steps
1. Create a domain with Duck DNS.
Navigate your web browser to Duck DNS , and use one of the OAuth providers to create an account. We need two values from Duck DNS: the token and domain. A token is automatically generated, but you need to add a domain (subdomain). The domain is the unique identifier for our specific VM instance on the public Internet.
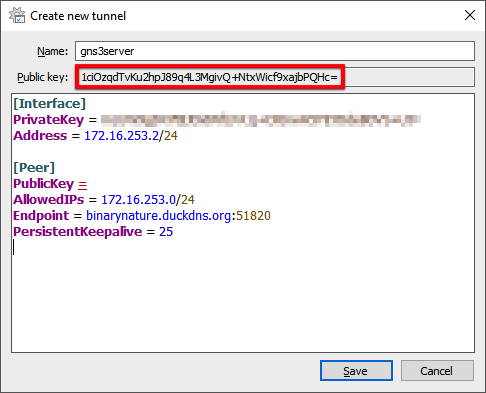
2. Create a WireGuard tunnel for the remote GNS3 server connection.
- Download and install WireGuard .
- Open the WireGuard application.
- Press the ⌃ + N key combination to add an empty tunnel.
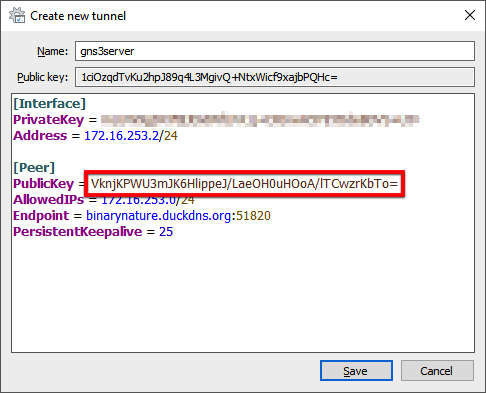
- Enter
gns3serverin the Name field. - Add the following content starting at the line below the PrivateKey attribute:
Address = 172.16.253.2/24

[Peer]
PublicKey =
AllowedIPs = 172.16.253.0/24
Endpoint = <subdomain>.duckdns.org:51820
PersistentKeepalive = 25
The Endpoint value is the Duck DNS domain you just created with the WireGuard port number appended. Don’t save yet because we still require the public key value from the peer. We will come back to complete the configuration in a later step.
Take note of your Public key value right below the Name property. An Ansible variable (wireguard_peer_pubkey) will require this in a later step.
3. Log in to the Microsoft Azure portal.
- Navigate a supported web browser to the Azure portal .
- When prompted, sign in to your Microsoft account.
New Customers: Microsoft offers a free trial
4. Open the Azure Cloud Shell.
The next several steps utilize the Azure Cloud Shell command-line interface. Select Bash for the shell type.
5. Verify the installation of terraform and ansible.
which terraform ansible
6. Create a projects directory and change to it.
mkdir $HOME/projects && cd $_
7. Clone the azure-gns3server repository from GitHub and change to the new directory.
git clone https://github.com/mweisel/azure-gns3server.git
cd azure-gns3server
8. Set the Azure variables for Terraform.
The Azure infrastructure variables are contained in the terraform.tfvars file. Open the project directory in the editor. It partitions the web browser window with the text editor at the top and the terminal at the bottom. This makes it simple to copy the output of the terminal commands and paste them in the editor.
code .
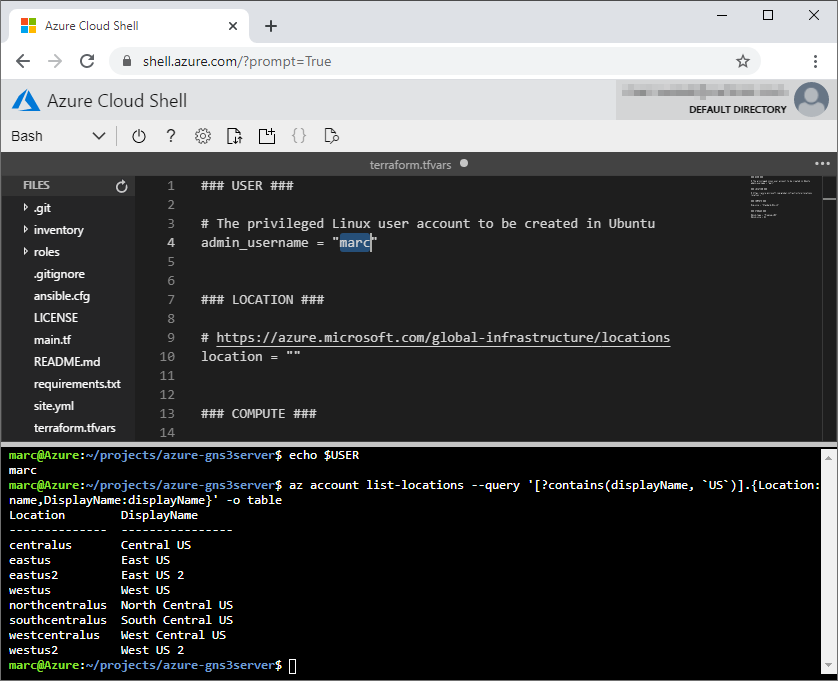
- For the USER section, the
admin_usernamevariable value is simply your user identity.
echo $USER
Set the value in the terraform.tfvars file.
### USER ###

# The privileged Linux user account to be created in Ubuntu
admin_username = "marc"
- The
locationvariable value depends on your region and if the region offers the Dv3 or Ev3 series virtual machines. This is a requirement for Azure nested virtualization.- Where is the nearest region in relation to me?
- Does my region offer either the Dv3 or Ev3 series virtual machine?
Get all locations .
az account list-locations --query '[].{Location:name,DisplayName:displayName}' -o table
We can also filter the output on a specific string. For example, I’m only interested in the US locations.
az account list-locations --query '[?contains(displayName, `US`)].{Location:name,DisplayName:displayName}' -o table
output:
Location        DisplayName
--------------  ----------------
centralus       Central US
eastus          East US
eastus2         East US 2
westus          West US
northcentralus  North Central US
southcentralus  South Central US
westcentralus   West Central US
westus2         West US 2
Alternatively, use Azure Latency Test to test the network latency from your geographic location to Azure datacenters around the world.
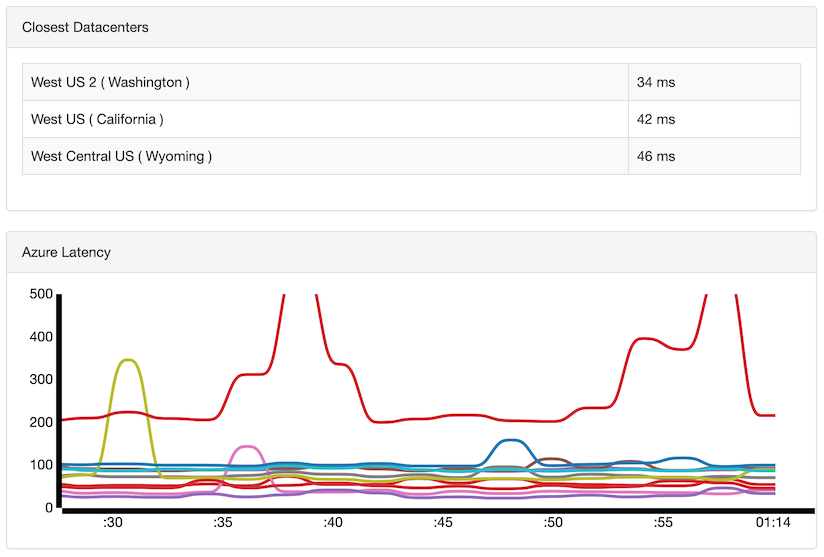
My nearest region is West US 2. Does the region offer either the Dv3 or Ev3 series virtual machine type?
az vm list-sizes -l westus2 --query '[?((starts_with(name, `Standard_D`) || starts_with(name, `Standard_E`)) && ends_with(name, `_v3`))].{Name:name,Cores:numberOfCores,Mem:memoryInMb}' -o table
output:
Name                 Cores    Mem
-------------------  -------  ------
Standard_D2_v3       2        8192
Standard_D4_v3       4        16384
Standard_D8_v3       8        32768
...
Set the value in the terraform.tfvars file.
### LOCATION ###

# https://azure.microsoft.com/global-infrastructure/locations
location = "West US 2"
- In the COMPUTE section, the size to select is determined by the virtual device type(s) and the amount we plan to run within our VM instance. The Cisco VIRL Resource Calculator
gives a reasonable estimate when using Cisco images. Don’t forget to uncomment the
vm_sizevariable.
Set the value in the terraform.tfvars file.
### COMPUTE ###

vm_size = "Standard_D4s_v3"
- The STORAGE section defines the Managed Disk
properties. The default provides us with 32 GB Standard HDD
(hard disk drive) storage. For my example, I decide to double the capacity and change the type to Premium SSD
(solid-state drive). Again, both the
disk_typeanddisk_sizevariables will need to be uncommented.
Set the value in the terraform.tfvars file.
### STORAGE ###

disk_type = "Premium_LRS"
disk_size = 64
Now, you may be asking: why are the COMPUTE and STORAGE variables commented out? If the variables aren’t set in the terraform.tfvars file, the defaults provided in the variables.tf file are used.
grep -E 'variable|default' variables.tf
output:
...
variable "vm_size" {
  default     = "Standard_D2_v3"
variable "disk_type" {
  default     = "Standard_LRS"
variable "disk_size" {
  default     = 32
...
The terraform.tfvars file is now complete.
- ⌃ + S to save the file.
9. Set the GNS3 variables for Ansible.
The GNS3-specific variables are contained in the vars.yml file.
- The gns3_version variable value needs to match the GNS3 client version installed on your local computer.

Set the value in the vars.yml file.
### GNS3 ###

# https://github.com/GNS3/gns3-server/releases
gns3_version: 2.2.5
- The DUCK DNS variables take the values from the first step. For example, my domain is
binarynatureand token isce2f4de5-3e0f-4149-8bcc-7a75466955d5.
Set the value in the vars.yml file.
### DUCK DNS ###

# https://www.duckdns.org
ddns_domain: binarynature
ddns_token: ce2f4de5-3e0f-4149-8bcc-7a75466955d5
- Finally, let’s wrap this up with the WIREGUARD section. Remember when I stated you should take note of the public key value in the second step? This is where you enter it.
Set the value in the vars.yml file.
### WIREGUARD ###

wireguard_peer_pubkey: 1ciOzqdTvKu2hpJ89q4L3MgivQ+NtxWicf9xajbPQHc=
The vars.yml file is now complete.
- ⌃ + S to save the file.
10. Create the SSH key pair.
SSH password authentication is disabled for the VM instance we’re connecting to, so let’s create an SSH key pair with no passphrase. The RSA public key (id_rsa.pub) of the matched pair is injected into the VM to allow the admin user (admin_username) to authenticate via SSH.
ssh-keygen -q -f $HOME/.ssh/id_rsa -N ''
11. Initialize the working directory for Terraform.
terraform init
12. Validate the Terraform configuration.
The validate command verifies whether the configuration is syntactically valid and internally consistent.
terraform validate
13. Run the apply command for Terraform.
The apply command builds the Azure infrastructure resources. Terraform then transfers the configuration management chore to Ansible once the VM instance is up and ready for an SSH connection.
terraform apply
Enter yes when prompted to approve the operation.
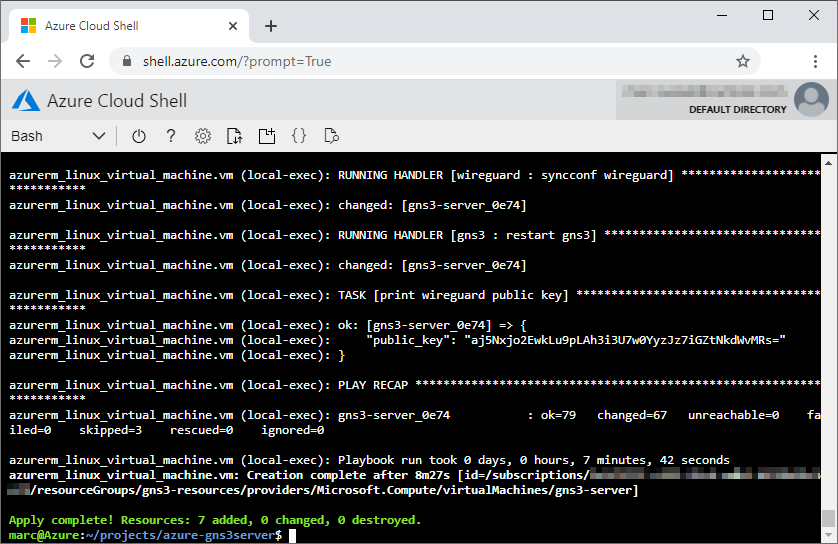
14. Complete the client WireGuard configuration and establish the VPN connection.
With the conclusion of the deployment, we can now retrieve the WireGuard public key from the peer to complete the WireGuard VPN configuration on our local computer.
- From the Azure Cloud Shell terminal, copy the
public_keyvalue …
...
azurerm_linux_virtual_machine.vm (local-exec): RUNNING HANDLER [wireguard : syncconf wireguard] *******************************
azurerm_linux_virtual_machine.vm (local-exec): changed: [gns3-server_0e74]
azurerm_linux_virtual_machine.vm (local-exec): RUNNING HANDLER [gns3 : restart gns3] ******************************************
azurerm_linux_virtual_machine.vm (local-exec): changed: [gns3-server_0e74]
azurerm_linux_virtual_machine.vm (local-exec): TASK [print wireguard public key] **********************************************
azurerm_linux_virtual_machine.vm (local-exec): ok: [gns3-server_0e74] => {
azurerm_linux_virtual_machine.vm (local-exec): "public_key": "VknjKPWU3mJK6HlippeJ/LaeOH0uHOoA/lTCwzrKbTo="
azurerm_linux_virtual_machine.vm (local-exec): }
azurerm_linux_virtual_machine.vm (local-exec): PLAY RECAP *********************************************************************
azurerm_linux_virtual_machine.vm (local-exec): gns3-server_0e74 : ok=79 changed=67 unreachable=0 failed=0 skipped=3 rescued=0 ignored=0
azurerm_linux_virtual_machine.vm (local-exec): Playbook run took 0 days, 0 hours, 6 minutes, 43 seconds
azurerm_linux_virtual_machine.vm: Creation complete after 8m43s [id=/subscriptions/fe4f377f-c833-45c4-adb2-6f72b19c3eb1/resourceGroups/gns3-resources/providers/Microsoft.Compute/virtualMachines/gns3-server]
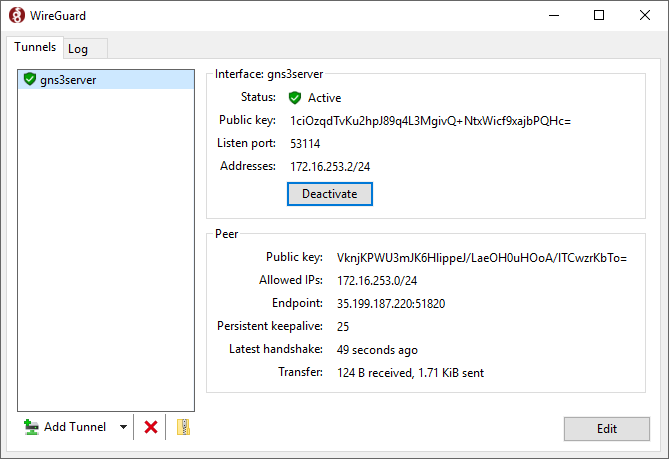
Apply complete! Resources: 7 added, 0 changed, 0 destroyed.and paste it as the value for the PublicKey variable.
- Click the Save button.
- At the WireGuard Tunnels list window, click the Activate button to establish the connection.
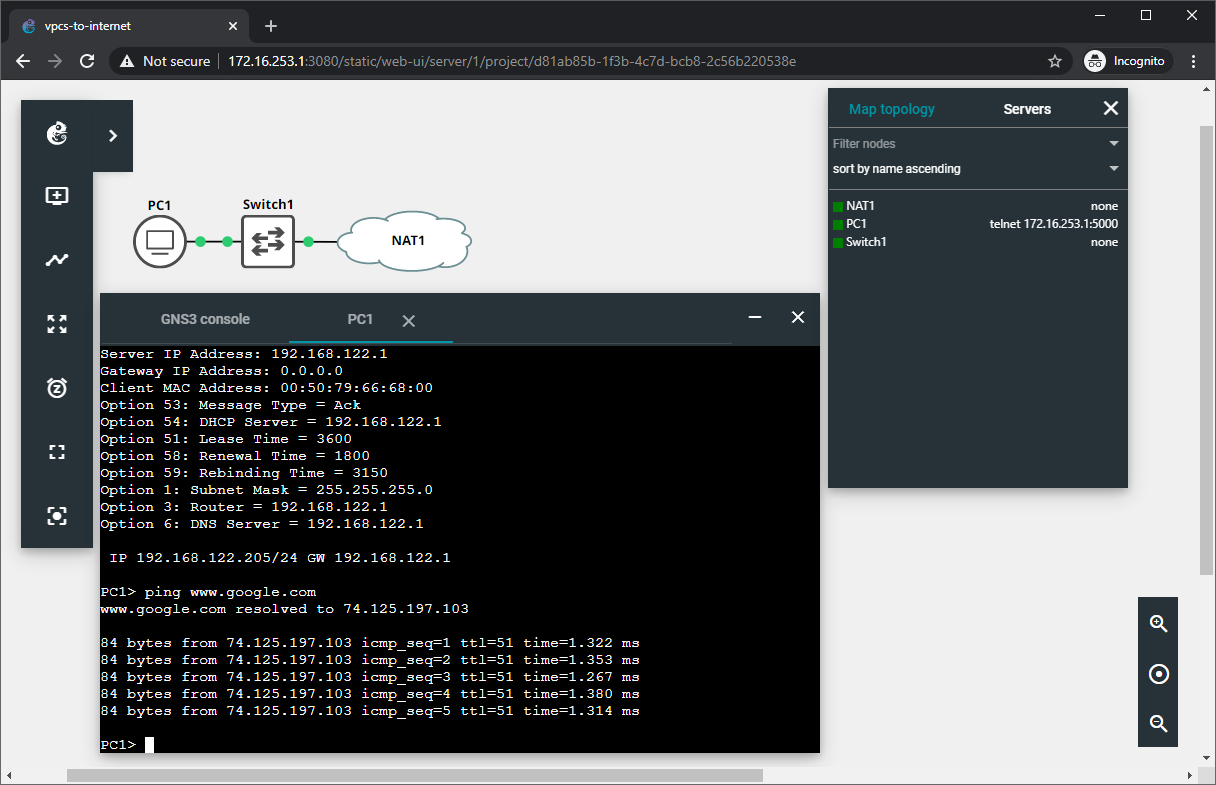
15. Connect to the remote GNS3 server with the GNS3 Web UI.
- Open a supported web browser on your local computer.
- Enter
http://172.16.253.1:3080into the address bar.
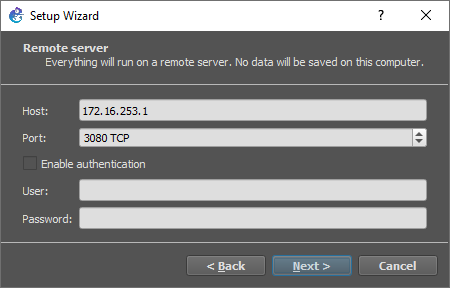
16. Bind the local GNS3 client to the remote GNS3 server.
- Open the GNS3 client application.
- In the Setup Wizard window, select Run appliances on a remote server (advanced usage) for server type.
- Click the Next button.
- Enter the following values for the Host and Port properties:
- Host:
172.16.253.1 - Port:
3080 TCP
- Host:
- Click the Next button.
- Click the Finish button.
17. All set.
Refer to the following resources to help you further configure GNS3:
- GNS3 Documentation
- GNS3 Fundamentals (Official Course): Part 1
- GNS3 Fundamentals (Official Course): Part 2
- Store and retrieve GNS3 images with Azure Blob Storage
GNS3 with Remote Server Workflow
1. Start the VM instance with Azure Cloud Shell.
az vm list -d -g gns3-resources -o table
output:
Name         ResourceGroup    PowerState      PublicIps    Fqdns    Location    Zones
-----------  ---------------  --------------  -----------  -------  ----------  -------
gns3-server  gns3-resources   VM deallocated                        westus2
az vm start -g gns3-resources -n gns3-server
2. Update Duck DNS.
az vm list-ip-addresses -g gns3-resources -n gns3-server -o table
output:
VirtualMachine    PublicIPAddresses    PrivateIPAddresses
----------------  -------------------  --------------------
gns3-server       52.246.249.16        10.52.1.4
ssh 52.246.249.16 'sudo systemctl restart duckdns'
3. Activate the WireGuard VPN session.
4. Open the GNS3 client application.
5. Start the node(s) within GNS3.
6. Happy Labbing!
7. Save the configuration at the node-level (e.g., copy run start, commit, etc.).
8. Stop the node(s) within GNS3.
9. Exit the GNS3 client application.
10. Deactivate the WireGuard VPN session.
11. Stop (Deallocate) the VM instance with Azure Cloud Shell.
az vm list -d -g gns3-resources -o table
output:
Name         ResourceGroup    PowerState    PublicIps      Fqdns    Location    Zones
-----------  ---------------  ------------  -------------  -------  ----------  -------
gns3-server  gns3-resources   VM running    52.246.249.16           westus2
az vm deallocate -g gns3-resources -n gns3-server
az vm list -d -g gns3-resources -o table
output:
Name         ResourceGroup    PowerState      PublicIps    Fqdns    Location    Zones
-----------  ---------------  --------------  -----------  -------  ----------  -------
gns3-server  gns3-resources   VM deallocated                        westus2
How Do I?
Update GNS3 server to the latest version
GNS3 just released a new version. We took the first step of downloading and installing the updated GNS3 client on our local computer, but we also have an existing GNS3 server VM instance in Azure. We’d rather not resort to deleting and redeploying the VM instance for a simple upgrade. What’s the most straightforward solution?
- Connect to the VM instance via SSH.
az vm list-ip-addresses -g gns3-resources -n gns3-server -o table
output:
VirtualMachine    PublicIPAddresses    PrivateIPAddresses
----------------  -------------------  --------------------
gns3-server       52.246.249.16        10.52.1.4
ssh 52.246.249.16
- Display the GNS3 server version for the currently installed Python package.
pip3 show gns3-server
output:
Name: gns3-server
Version: 2.2.5
Summary: GNS3 server
Home-page: http://github.com/GNS3/gns3-server
Author: None
Author-email: None
License: GNU General Public License v3 (GPLv3)
Location: /usr/local/lib/python3.6/dist-packages
Requires: psutil, raven, jsonschema, async-timeout, async-generator, aiofiles, yarl, Jinja2, aiohttp-cors, aiohttp, distro- Upgrade to the latest GNS3 server version.
sudo -H pip3 install --upgrade gns3-server
- Restart the GNS3 server service.
sudo systemctl restart gns3
- Verify the updated GNS3 server version number.
gns3server --version
- Verify the current status of the GNS3 server service.
systemctl status gns3
- Verify the
gns3serverprocess is listening on the default port.
sudo ss -ltnp sport eq 3080
- Finally, perform another verification step using the GNS3 API.
curl -s http://127.0.0.1:3080/v2/computes
- Exit the shell to disconnect.
exit
Delete the Azure resources created by Terraform
The destroy command deletes the Azure resources associated with the deployment. Make sure to copy any pertinent data (e.g., GNS3 projects, device configs, etc.) from the VM instance’s storage before performing this operation.
terraform destroy
Enter yes when prompted to approve the operation.