Before we work our way through the steps, I will start by pointing out GNS3 server has the following constraints when running on Apple Silicon:
- Lack of Linux KVM for x86_64 virtualized guests
- Slight performance penalty with emulated x86_64 Linux binaries (Rosetta )
The following are my results after testing a number of different Cisco device types:
| Device | Working? | Information |
|---|---|---|
| IOL | ✅ | - |
| IOL L2 | ✅ | - |
| IOSv | ✅ | - |
| IOSv L2 | ✅ | - |
| ASAv | ❌ | Requires SSSE3 CPU instructions for cryptographic operations |
| Catalyst 8000V | ❌ | Requires vmx or svm CPU flag for Linux KVM |
| Nexus 9000v | ❌ | Requires vmx or svm CPU flag for Linux KVM |
As you can see, we’re primarily limited to Cisco (IOL , IOSv , Dynamips ) images, VPCS, and Docker containers. The upside is that we’re rarely CPU-bound running labs on Apple Silicon. The amount of system memory in the Mac is usually the limiting factor. And let’s face it: connecting to a dedicated x86_64 GNS3 compute server with ample CPU cores and RAM is the ideal solution for running large labs.
On the other hand, it can also be convenient to quickly spin up a 20-node CCIE route and switch lab on your portable MacBook.
Prerequisites
- Mac computer with Apple silicon
- macOS 14.0 or later
- Git
- uv
Steps
- Download OrbStack and open it.
An OrbStack Linux machine with seamless Rosetta integration is the magic sauce for hosting our GNS3 server and components.
- Open your favorite terminal emulator.
We will work from the command line for most of the following steps.
- Change to the
Documentsdirectory.
cd ~/Documents
- Clone the gns3-server-orbstack repo from GitHub.
git clone https://github.com/mweisel/gns3-server-orbstack.git
- Change to the
gns3-server-orbstackdirectory.
cd gns3-server-orbstack
- Create a Python virtual environment for Ansible.
uv sync
- Verify Ansible is installed.
uv run ansible --version
- Start OrbStack (if not already started).
orb status || orb start
- Create the
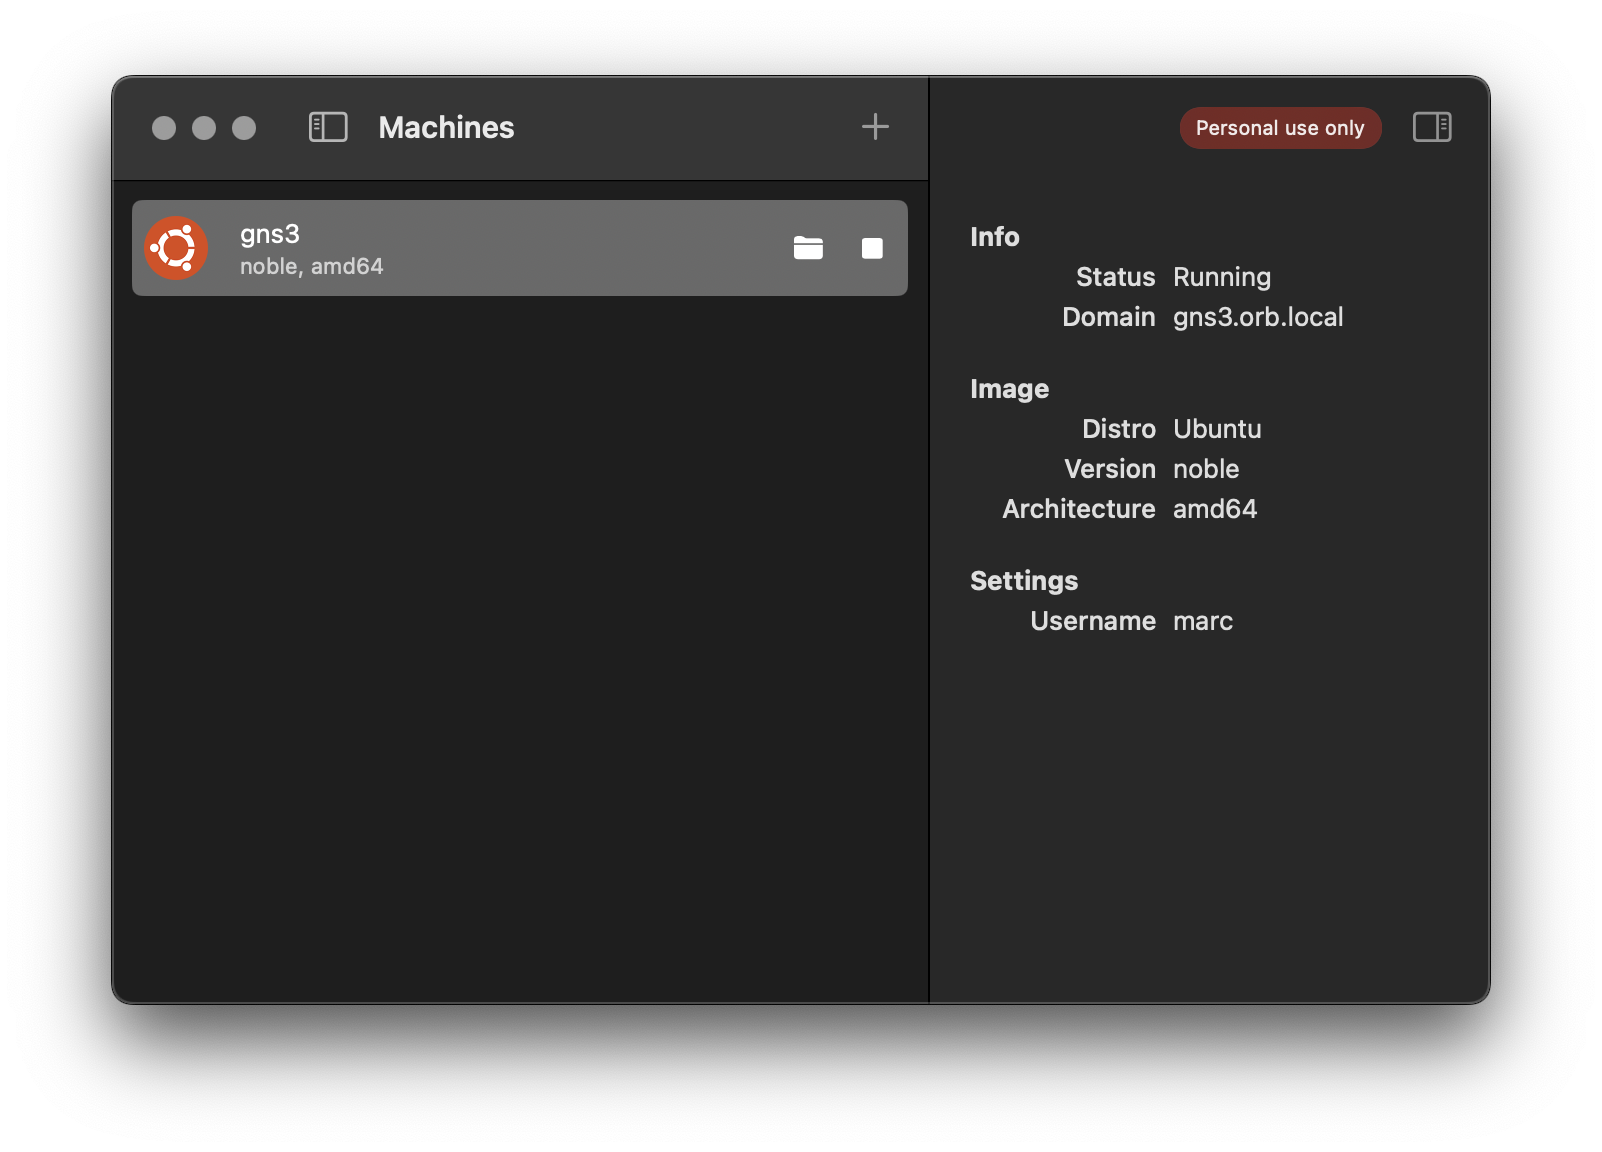
gns3Linux machine.
orb create --arch amd64 ubuntu:noble gns3
- Verify the
gns3Linux machine is listed and in arunningstate.
orb list
output:
NAME  STATE    DISTRO  VERSION  ARCH
----  -----    ------  -------  ----
gns3  running  ubuntu  noble    amd64
- Test Ansible connectivity to the
gns3Linux machine.
uv run ansible all -m ping
output:
gns3@orb | SUCCESS => {
    "ansible_facts": {
        "discovered_interpreter_python": "/usr/bin/python3.12"
    },
    "changed": false,
    "ping": "pong"
}
- Deploy the latest stable release of GNS3 server and components.
uv run ansible-playbook server.yml
Sit back and relax. The automated process should take less than 10 minutes to complete.
- Check availability after the Ansible playbook completes.
Verify the GNS3 server is up and ready with a HTTP GET request.
curl -s http://gns3.orb.local:3080/v3/version
- Open the GNS3 WebUI with your default web browser.
open http://gns3.orb.local:3080
- Attach your GNS3 client to the GNS3 server.
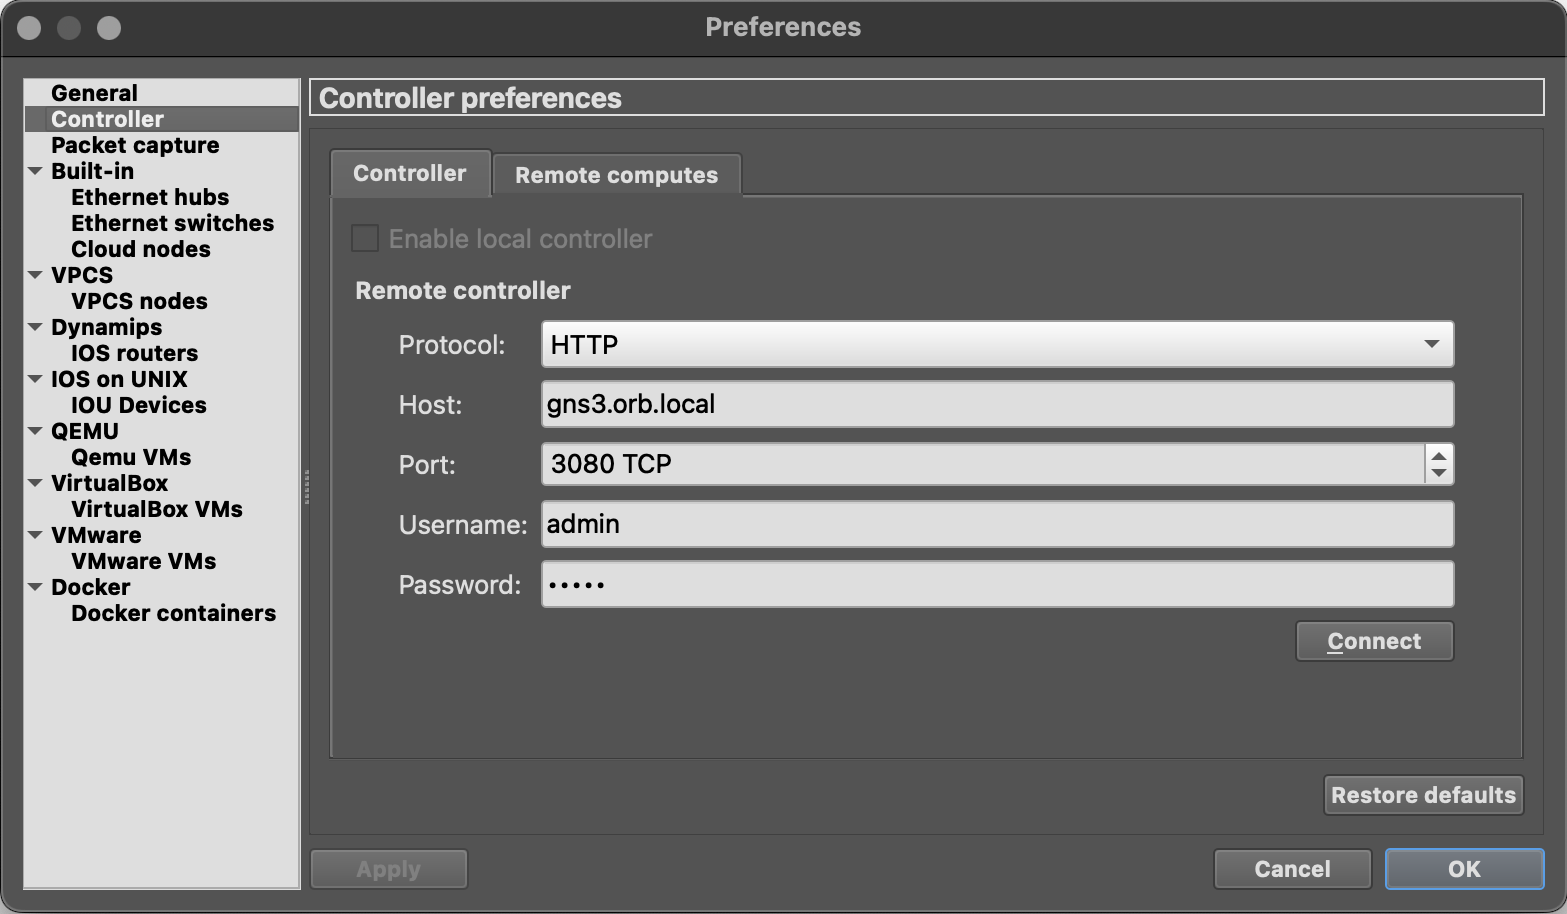
-
Open the GNS3 client application.
-
Click the Settings button.
-
Select Controller on the left side menu.
-
Select the Controller tab.
-
Enter the following values for the Remote controller section:
- Protocol:
HTTP - Host:
gns3.orb.local - Port:
3080 TCP - Username:
admin - Password:
admin
- Protocol:
-
Click the Connect button to test the connection to the controller.
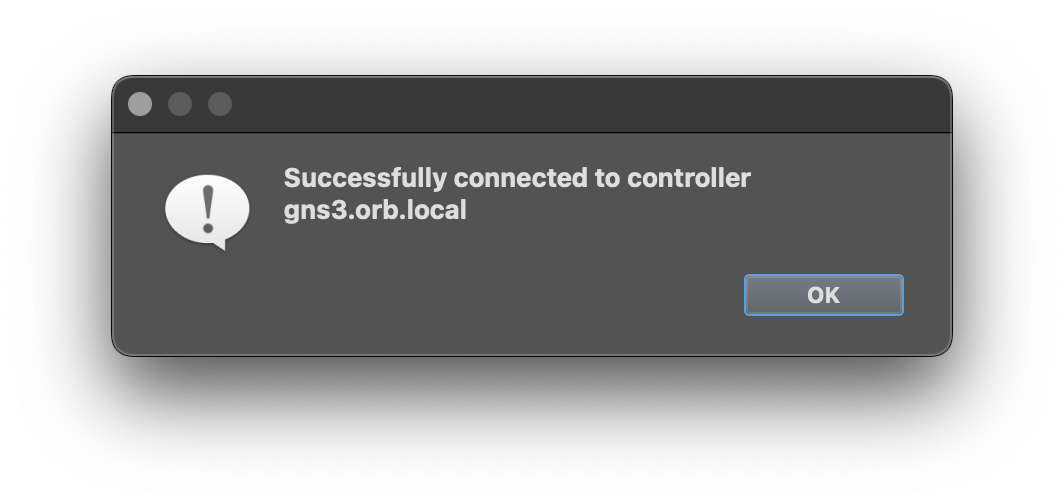
-
Click the OK button to save the configuration.
-
Workflow
- Start OrbStack from the command line or open the OrbStack GUI.
orb status || orb start
- Start the
gns3Linux machine from the command line or the OrbStack GUI.
orb start gns3
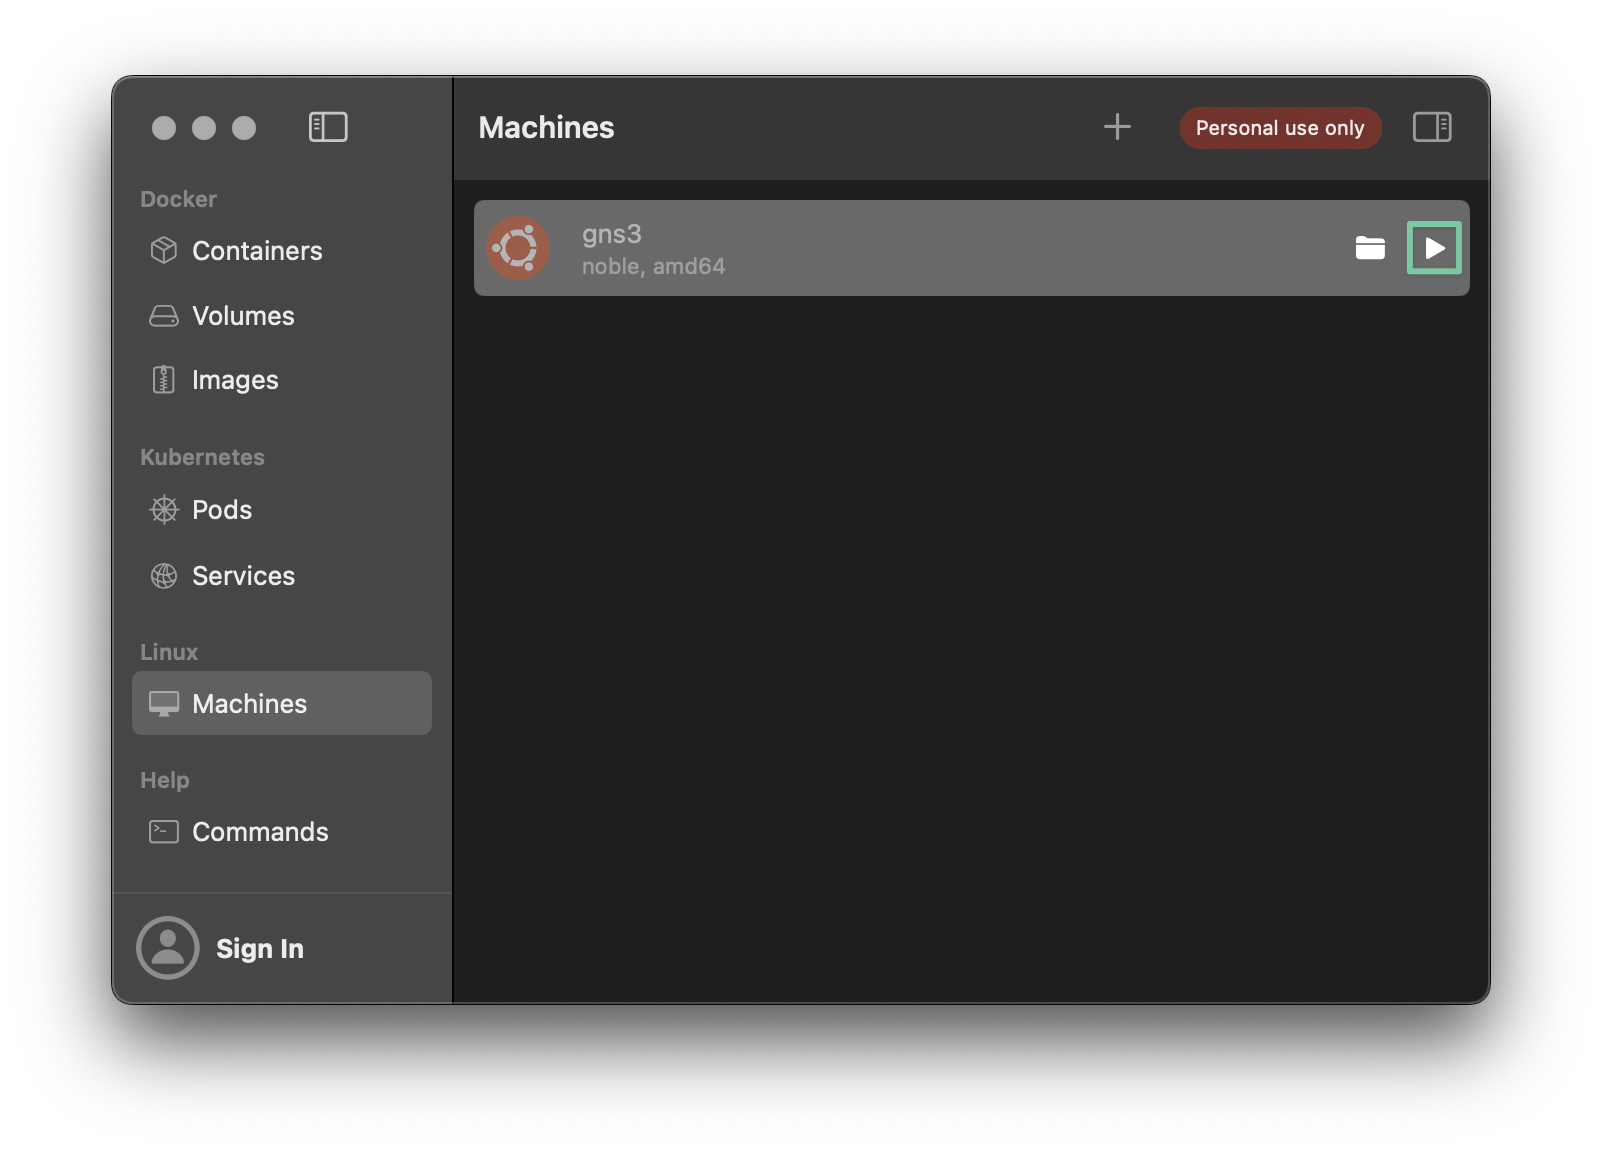
- Open the GNS3 client application or WebUI.
open http://gns3.orb.local:3080
-
Create (or open) a project.
-
Start the devices.
-
Happy Labbing!
-
Save the configuration at the device-level (e.g.,
copy run start,wr mem, etc.). -
Stop the devices.
-
Close the GNS3 client application.
-
Stop the
gns3Linux machine from the command line or the OrbStack GUI.
orb stop gns3
Q&A
- How do I install a specific GNS3 server version?
The Ansible playbook will install the latest stable version by default. You can override this by explicitly setting the gns3_version variable.
uv run ansible-playbook server.yml -e 'gns3_version=3.0.1'
- How do I display the
gns3serverlog to aid in troubleshooting?
orb -m gns3 journalctl -u gns3 -f