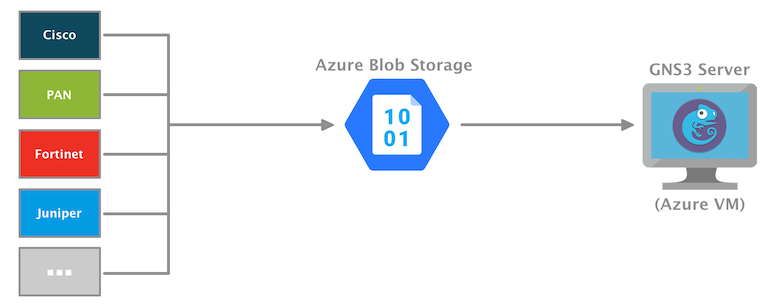
This post is a companion to the previous GNS3 with Microsoft Azure post. For many of us, an asymmetrical Internet connection usually equates to a much slower upload than download speed. Specifically, in our case, this results in a time-consuming process of uploading GNS3 image files to our remote gns3server VM instance.
- What if we need to recreate the disk attached to our gns3server VM instance?
- Modify the type (i.e., HDD to SSD) or decrease the size of the disk, which again would require us to recreate the disk?
- What if we need to spin up multiple gns3server VM instances for training purposes?
Each situation may require a good amount of unnecessary (re)uploading.
Azure Blob Storage is the solution we’re looking for. We simply upload the GNS3 image files once to an Azure Blob Storage container. From that point forward, we can copy the GNS3 image files to our gns3server using the speedy Azure network.
5 GB of LRS Blob Storage (per month) is included free within the first year of your Azure subscription.
Steps
-
Log in to the Microsoft Azure portal.
- Navigate a supported web browser to the Azure portal
- Sign in to your Microsoft account when prompted
-
Open the Azure Cloud Shell.
The next several steps utilize the Azure Cloud Shell command-line interface. Select Bash for the shell type.
- Create a resource group.
Every storage account must belong to an Azure resource group. For my example, I will name it rg-my-gns3-images and place it in the West US 2 region. This is the same region where my gns3server VM instance is located.
az group create --name rg-my-gns3-images --location westus2
- Create a storage account.
All access to data objects in Azure Storage occurs through a storage account. Create a general-purpose v2 storage account with locally-redundant storage (LRS).
A storage account name must be unique across Azure. The name is also required to be between 3 and 24 characters in length and use numbers and lowercase letters only.
az storage account create --resource-group rg-my-gns3-images --name mygns3storage --location westus2 --sku Standard_LRS --kind StorageV2
- Create an Azure Blob Storage container.
Blob storage exposes three resources: your storage account, the containers in the account, and the blobs in a container. The container we create in this step will serve as the container for our GNS3 image files (blobs).
az storage container create --account-name mygns3storage --name gns3-images
-
Upload your GNS3 image file(s) to the Azure Blob Storage container.
- In the Azure portal, navigate to the container you created in the previous step
- Select the container
- Click the Upload button
- Browse your local file system for an image file
- Click the Upload button
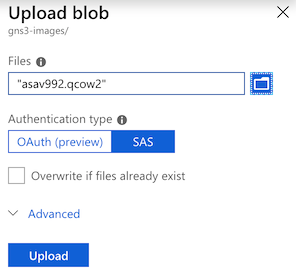
Azure Storage Explorer is another method to upload your GNS3 image files to the container.
- Get the primary key for your storage account.
az storage account keys list -g rg-my-gns3-images -n mygns3storage --query '[?keyName==`key1`].value' -o tsv
output:
7nYEf1F3jgthQIK9X26osgqMgZESyI/Hkxh6KeDcI9NN9CrTTd7np7dRd/D2STSKdolhzZYOPMe9YlysWUEuKA==
- Connect to your VM instance via SSH.
az vm list-ip-addresses -g gns3-resources -n gns3-server -o table
output:
VirtualMachine    PublicIPAddresses    PrivateIPAddresses
----------------  -------------------  --------------------
gns3-server       52.246.249.16        10.52.1.4
ssh 52.246.249.16
- Install AzCopy .
cd $HOME/src
curl -Lo azcopy.tar.gz https://aka.ms/downloadazcopylinux64
tar xvf azcopy.tar.gz
sudo ./install.sh
cd $HOME
- Verify the successful installation of
azcopy.
type azcopy
azcopy --version
- Run an elevated shell.
sudo -i
- Change to the
imagesdirectory.
cd /opt/gns3/GNS3/images
- Copy all GNS3 image files from the remote container to the local
imagesdirectory.
azcopy --source https://mygns3storage.blob.core.windows.net/gns3-images --destination /opt/gns3/GNS3/images --source-key 7nYEf1F3jgthQIK9X26osgqMgZESyI/Hkxh6KeDcI9NN9CrTTd7np7dRd/D2STSKdolhzZYOPMe9YlysWUEuKA== --recursive
- Uncompress Cisco IOS image files if using Dynamips.
apt update && apt -y install unzip
ls -1 c7200*
output:
c7200-adventerprisek9-mz.153-3.XB12.bin
c7200-adventerprisek9-mz.155-2.XB.bin
for f in c7200*; do unzip -p "$f" > "${f%.bin}.image"; rm "$f"; done
ls -1 c7200*
output:
c7200-adventerprisek9-mz.153-3.XB12.image
c7200-adventerprisek9-mz.155-2.XB.image
- Change the owner of the GNS3 image files to the
gns3user and group.
chown gns3:gns3 *.{bin,image,qcow2,vmdk}
- If using IOL, set the binary files as executable.
ls -lh i86bi_linux*
output:
-rw-r--r-- 1 gns3 gns3 176M Aug 26 23:12 i86bi_linux-adventerprisek9-ms.157-3.M.bin
-rw-r--r-- 1 gns3 gns3 101M Aug 26 23:12 i86bi_linux_l2-ipbasek9-ms.high_iron_aug9_2017b.bin
chmod -v u+x i86bi_linux*
output:
mode of 'i86bi_linux-adventerprisek9-ms.157-3.M.bin' changed from 0644 (rw-r--r--) to 0744 (rwxr--r--)
mode of 'i86bi_linux_l2-ipbasek9-ms.high_iron_aug9_2017b.bin' changed from 0644 (rw-r--r--) to 0744 (rwxr--r--)
- Exit to return to the Azure Cloud Shell.
exit
exit
GNS3 client
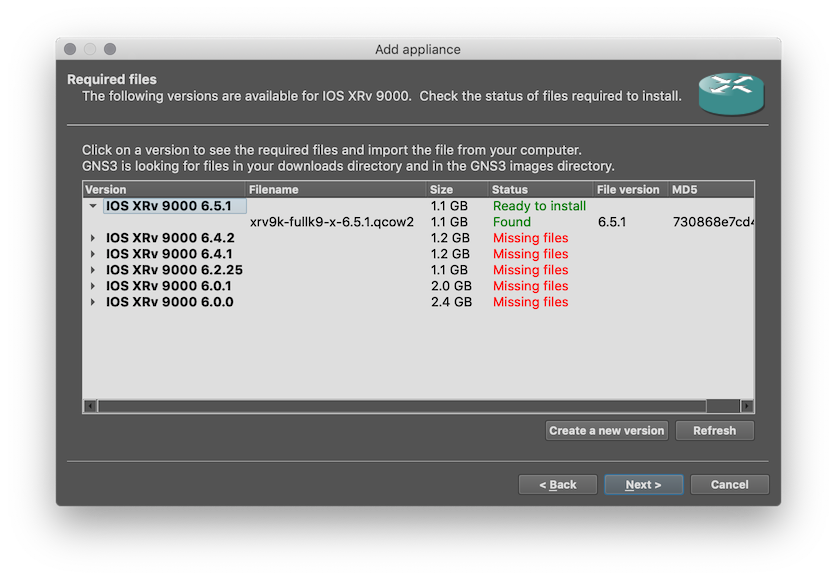
On our local GNS3 client, we can perform the same steps for the appliance import process just as we normally would. The difference is GNS3 will now find the existing images located in the remote gns3server images directory, so it will skip the upload operation.