The Cisco Nexus 9000v shares the same software image as its hardware counterpart, so it provides a terrific solution for feature testing and/or network automation. The only caveat is the hardware resources required to run it. I recommend a Mac with at least 16GB of memory and a dual-core CPU.
Ingredients used in this guide:
- macOS Mojave (10.14)
- VMware Fusion 11 Pro
- Vagrant 2.2.3
- VMware provider for Vagrant
- Cisco Nexus 9000v Switch
Steps
1. Sign in to your Cisco account to download the Nexus 9000v Switch software.
- The software is available here
- Select the Download Options link
- Select the version from the menu on the left. For my example, I will be using the Release 7.0(3)I7(5a)
- Click the Download button for Cisco Nexus 9000/3000 Virtual Switch for ESXi or Fusion
- Save the
nxosv-final.7.0.3.I7.5a.ovafile to the Downloads folder
2. Create the Cisco Nexus 9000v template.
- Open the VMware Fusion application
- Menu: File → Import…
- Click the Choose File… button
- Navigate to and select the
nxosv-final.7.0.3.I7.5a.ovafile in the Downloads folder - Click the Open button
- Click the Continue button
- Click the Continue button to use the Default profile
- Save As: Nexus
- Click the Save button
- Click the Customize Settings button to modify the virtual appliance settings
- Set Processors to 2 processor cores
- Set Memory to 6144 MB
- Set Network Adapter to Share with my Mac
- Remove CD/DVD (IDE)
- Upgrade the VM hardware version to 16 (Compatibility → Upgrade)
- Close the Settings window
- Quit the VMware Fusion application
3. Remove additional network interfaces from the virtual appliance configuration file.
From a macOS terminal, remove Network Adapter 2 to Network Adapter 10.
sed -i '' '/^ethernet[^0]/d' $HOME/Virtual\ Machines.localized/Nexus.vmwarevm/Nexus.vmx
The default virtual machine folder (directory) for VMware Fusion 11 is
$HOME/Virtual\ Machines.localized. Upgrades and earlier versions use$HOME/Documents/Virtual\ Machines.localizedas the default.
Verify only Network Adapter remains.
grep '^ethernet' $HOME/Virtual\ Machines.localized/Nexus.vmwarevm/Nexus.vmx
output:
ethernet0.present = "TRUE"
ethernet0.virtualDev = "e1000"
ethernet0.connectionType = "nat"
ethernet0.addressType = "generated"
ethernet0.wakeonpcktrcv = "true"
ethernet0.allowguestconnectioncontrol = "true"
4. Add a custom serial port (for management via console connection).
From a macOS terminal, append a serial port device to the virtual appliance configuration file.
printf 'serial0.present = "TRUE"\nserial0.yieldOnMsrRead = "TRUE"\nserial0.fileType = "network"\nserial0.fileName = "telnet://127.0.0.1:52099"\n' >> $HOME/Virtual\ Machines.localized/Nexus.vmwarevm/Nexus.vmx
Verify the component has been added.
tail -4 $HOME/Virtual\ Machines.localized/Nexus.vmwarevm/Nexus.vmx
output:
serial0.present = "TRUE"
serial0.yieldOnMsrRead = "TRUE"
serial0.fileType = "network"
serial0.fileName = "telnet://127.0.0.1:52099"
5. Start the virtual appliance.
From a macOS terminal, start the virtual appliance with the vmrun command with the headless parameter.
/Applications/VMware\ Fusion.app/Contents/Library/vmrun start $HOME/Virtual\ Machines.localized/Nexus.vmwarevm/Nexus.vmx nogui
6. Initiate a console connection to the Nexus 9000v virtual appliance.
Telnet has been removed from macOS High Sierra and later. Refer to How to Get Telnet for MacOS in Mojave or High Sierra .
Open a separate macOS terminal window (or tab) and enter the following command:
telnet 127.0.0.1 52099
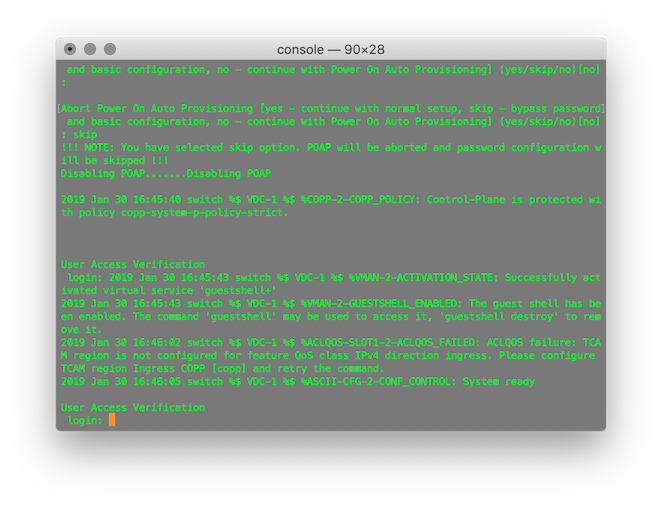
7. Skip Power On Auto Provisioning (POAP) when prompted.
Abort Power On Auto Provisioning [yes - continue with normal setup, skip - bypass password and basic configuration, no - continue with Power On Auto Provisioning] (yes/skip/no)[no]:
Enter skip to bypass.
8. Log in as the admin user.
Log in as the admin user with no password.
9. Configure the boot image and reload.
Set the password for the admin user.
conf
username admin password Cisco1984!
The specific Cisco Nexus 9000v version I am using has a bug , so I will disable image signature verification as a workaround.
no feature signature-verification
Enter y to confirm.
Set the boot image and verify.
dir bootflash:nxos.7.0.3.I7.5a.bin
boot nxos bootflash:nxos.7.0.3.I7.5a.bin
sh boot
Save the configuration and reload.
end
copy run start
reload
10. Get and display the default Vagrant box SSH public key.
Vagrant recommends SSH key-based authentication rather than using a password. We will copy and paste the public key in an upcoming step.
Open a separate macOS terminal window (or tab) and enter the following command:
curl -LS https://raw.githubusercontent.com/hashicorp/vagrant/master/keys/vagrant.pub
11. Log in as the admin user.
- login:
admin - Password:
Cisco1984!
12. Set a baseline configuration for the Vagrant box.
Create the vagrant user.
conf
feature bash-shell
username vagrant password vagrant role network-admin
username vagrant sshkey ssh-rsa AAAAB3NzaC1yc2EAAAABIwAAAQEA6NF8iallvQVp22WDkTkyrtvp9eWW6A8YVr+kz4TjGYe7gHzIw+niNltGEFHzD8+v1I2YJ6oXevct1YeS0o9HZyN1Q9qgCgzUFtdOKLv6IedplqoPkcmF0aYet2PkEDo3MlTBckFXPITAMzF8dJSIFo9D8HfdOV0IAdx4O7PtixWKn5y2hMNG0zQPyUecp4pzC6kivAIhyfHilFR61RGL+GPXQ2MWZWFYbAGjyiYJnAmCP3NOTd0jMZEnDkbUvxhMmBYSdETk1rRgm+R4LOzFUGaHqHDLKLX+FIPKcF96hrucXzcWyLbIbEgE98OHlnVYCzRdK8jlqm8tehUc9c9WhQ==
Disable the timeout for the virtual terminal line.
line vty
 exec-timeout 0
 exit
Configure the management interface.
interface mgmt0
 ip address dhcp
 no shut
 end
Verify the configuration.
sh user-account vagrant
sh ip int brief vrf management
ping www.google.com source-interface mgmt0
Save the configuration.
copy run start
Exit the session.
exit
Use the ⌃ + ] key combo to escape back to the telnet prompt.
Enter q at the telnet> prompt to quit.
13. Stop the virtual appliance.
Stop the virtual appliance from the original macOS terminal window (or tab).
/Applications/VMware\ Fusion.app/Contents/Library/vmrun stop $HOME/Virtual\ Machines.localized/Nexus.vmwarevm/Nexus.vmx
14. Create the Vagrant box.
Change the current directory.
cd $HOME/Virtual\ Machines.localized/Nexus.vmwarevm
Remove generated MAC addresses from the Nexus.vmx configuration file.
sed -i '' '/generatedAddress/d' Nexus.vmx
Remove UUID properties from the Nexus.vmx configuration file.
sed -i '' '/uuid/d' Nexus.vmx
Create the metadata.json file for the VMware provider.
printf '{"provider": "vmware_desktop"}' > metadata.json
List the directory contents to verify the essential files are present.
du -csh *
output:
1.5G Nexus-disk1.vmdk
4.0K Nexus.plist
  0B Nexus.vmsd
4.0K Nexus.vmx
4.0K Nexus.vmxf
4.0K metadata.json
268K nvram
276K vmware.log
1.5G total
Package the Vagrant box file with tar.
tar cvzf cisco-nexus-9kv-703-i7-5a.box ./*
15. Add the Vagrant box.
Add the Vagrant box to our local inventory.
vagrant box add --provider vmware_desktop --name cisco-nexus-9kv-703-i7-5a cisco-nexus-9kv-703-i7-5a.box
Verify the box is now listed.
vagrant box list | grep -i nexus
16. Test it.
Create a directory for a test project and change to it.
mkdir $HOME/Documents/test-nexus && cd $_
Download an example Vagrantfile.
curl -Lo Vagrantfile https://raw.githubusercontent.com/mweisel/vagrant-vmware-examples/master/cisco-nexus-9kv-single-mgmt-int
Validate the Vagrantfile.
vagrant validate
Show the current status of the vagrant machine.
vagrant status
17. Vagrant Up!
vagrant up
The status of the vagrant machine should now be in the running state.
vagrant status
We can connect to the vagrant machine with SSH.
vagrant ssh

We can also connect to the vagrant machine with a console connection (out-of-band management) via telnet.
telnet 127.0.0.1 52001
18. More Vagrant commands
Stop the vagrant machine with the force option.
vagrant halt -f
Destroy (delete) the vagrant machine with the force option.
vagrant destroy -f