And yet another virtual network appliance to Vagrantize…
Ingredients used in this guide:
- macOS Mojave (10.14)
- VMware Fusion 11 Pro
- Vagrant 2.2.3
- VMware provider for Vagrant
- Cisco IOS XRv Router v6.1.3
The Cisco IOS XRV Router image is available as part of your Cisco VIRL subscription.
Steps
1. Convert the disk image format type.
The Cisco IOS XRv Router is provided in the qcow2 (QEMU) disk image format. The QEMU disk image utility (qemu-img) is required to convert the disk image to the vmdk (VMware) format. The utility is included with the qemu package. Use either MacPorts
or Homebrew
to install.
From a macOS terminal, first verify the original disk image format.
qemu-img info iosxrv-k9-demo-6.1.3.qcow2 | grep file.format
A consistency check is also recommended before we convert the disk image.
qemu-img check iosxrv-k9-demo-6.1.3.qcow2
Convert the disk image.
qemu-img convert -pO vmdk iosxrv-k9-demo-6.1.3.qcow2 iosxrv-k9-demo-6.1.3.vmdk
Finally, verify the modified disk image.
qemu-img info iosxrv-k9-demo-6.1.3.vmdk | grep file.format
2. Create the Cisco IOS XRv virtual appliance template.
- Open the VMware Fusion application
- Menu: File → New…
- Select the Create a custom virtual machine option
- Click the Continue button
- Select Other 64-bit as the operating system
- Click the Continue button
- Select Legacy BIOS for the boot firmware type
- Click the Continue button
- Select Use an existing virtual disk
- Click the Choose virtual disk… button
- Navigate to and select
iosxrv-k9-demo-6.1.3.vmdk - Select Make a separate copy of the virtual disk
- Click the Choose button
- Click the Continue button
- Click the Customize Settings button to modify the virtual appliance settings
- Save As:
IOS-XRv-613 - Click the Save button
3. Modify/Verify the following attributes in the VM Settings:
| Component | Value |
|---|---|
| Processors | 1 processor core |
| Memory | 2048 MB |
| Network Adapter | Share with my Mac |
| Hard Disk (IDE) | iosxrv-k9-demo-6.1.3.vmdk |
| CD/DVD (IDE) | Remove CD/DVD Drive |
| Sound Card | Remove Sound Card |
| USB | Remove USB Controller |
4. Close the VMware Fusion application.
We will be working from the command line for the remainder of the tutorial.
5. Add a custom serial port (for management via console connection).
From a macOS terminal, append a serial port device to the virtual appliance configuration file.
printf 'serial0.present = "TRUE"\nserial0.yieldOnMsrRead = "TRUE"\nserial0.fileType = "network"\nserial0.fileName = "telnet://127.0.0.1:52099"\n' >> $HOME/Virtual\ Machines.localized/IOS-XRv-613.vmwarevm/IOS-XRv-613.vmx
The default virtual machine folder (directory) for VMware Fusion 11 is
$HOME/Virtual\ Machines.localized. Upgrades and earlier versions use$HOME/Documents/Virtual\ Machines.localizedas the default.
Verify the component has been added.
tail -4 $HOME/Virtual\ Machines.localized/IOS-XRv-613.vmwarevm/IOS-XRv-613.vmx
output:
serial0.present = "TRUE"
serial0.yieldOnMsrRead = "TRUE"
serial0.fileType = "network"
serial0.fileName = "telnet://127.0.0.1:52099"
6. Start the virtual appliance.
From a macOS terminal, start the virtual appliance with the vmrun command using the headless parameter.
/Applications/VMware\ Fusion.app/Contents/Library/vmrun start $HOME/Virtual\ Machines.localized/IOS-XRv-613.vmwarevm/IOS-XRv-613.vmx nogui
The virtual appliance should now be in the running state.
/Applications/VMware\ Fusion.app/Contents/Library/vmrun list
output:
Total running VMs: 1
/Users/marc/Virtual Machines.localized/IOS-XRv-613.vmwarevm/IOS-XRv-613.vmx
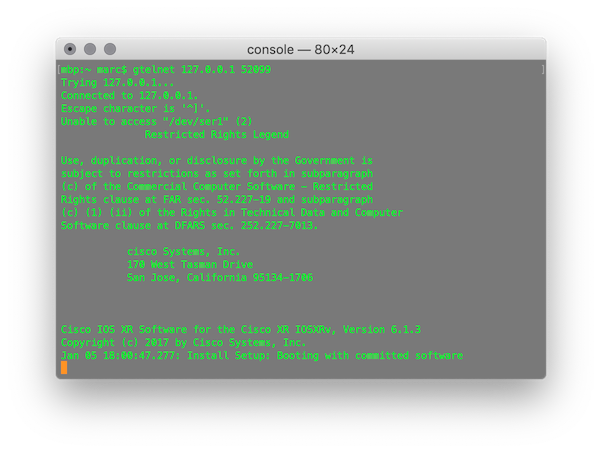
7. Initiate a console connection (via telnet) to the virtual appliance.
Telnet has been removed from macOS High Sierra and later. Refer to How to Get Telnet for MacOS in Mojave or High Sierra .
Open a separate macOS terminal window (or tab) and enter the following command:
telnet 127.0.0.1 52099
8. Set root credentials.
When the router boots for the first time, the system prompts the user to configure root credentials. For my example, I will create a user named superuser with the password superuser.
!!!!!!!!!!!!!!!!!!!! NO root-system username is configured. Need to configure root-system username. !!!!!!!!!!!!!!!!!!!!

         --- Administrative User Dialog ---


  Enter root-system username: superuser
  Enter secret: superuser
  Enter secret again: superuser
9. Log in with the new credentials.
Please login with any configured user/password, or cisco/cisco


User Access Verification

Username: superuser
Password: superuser
10. Set a baseline configuration for the Vagrant box.
Create the vagrant user.
conf
username vagrant
 group root-system
 secret vagrant
 exit
Set the hostname and domain.
hostname xrv
domain name example.com
Set some lab features.
domain lookup disable
line default
 exec-timeout 0 0
 exit
vty-pool default 0 4 line-template default
Set the management interface.
int MgmtEth0/0/CPU0/0
 ipv4 addr dhcp
 no shut
 exit
Commit the changes.
commit label VAGRANT-BASE
end
The management interface should be up with an IPv4 address set by DHCP.
sh ipv4 int MgmtEth0/0/CPU0/0
output:
Sat Jan  5 18:50:34.553 UTC
MgmtEth0/0/CPU0/0 is Up, ipv4 protocol is Up
  Vrf is default (vrfid 0x60000000)
  Internet address is 192.168.200.132/24
  MTU is 1514 (1500 is available to IP)
  Helper address is not set
  Multicast reserved groups joined: 224.0.0.2 224.0.0.1
  Directed broadcast forwarding is disabled
  Outgoing access list is not set
  Inbound  common access list is not set, access list is not set
  Proxy ARP is disabled
  ICMP redirects are never sent
  ICMP unreachables are always sent
  ICMP mask replies are never sent
  Table Id is 0xe0000000
Log out the superuser user.
exit
11. Configure Secure Shell (SSH).
Log in with the vagrant user.
User Access Verification

Username: vagrant
Password: vagrant
Generate a RSA key pair with the default key modulus size (2048).
crypto key generate rsa
Force the SSH server to accept only SSHv2 client connections.
conf
ssh server v2
commit label VAGRANT-BASE-SSH
end
Log out the vagrant user.
exit
Vagrant recommends using SSH key-based authentication. Unlike most Cisco network operating systems, IOS XR requires a binary data file instead of the usual public key string value.
We will first grab the content from the insecure Vagrant public key file hosted at GitHub. We then use a chain of commands to extract the second field, decode the incoming Base64 stream into a binary data file, which is saved at the root of our home directory.
Open a separate macOS terminal window (or tab) and enter the following commands:
pubkey=$(curl -Ls https://raw.githubusercontent.com/hashicorp/vagrant/master/keys/vagrant.pub)
echo $pubkey | awk '{ print $2 }' | base64 -Do $HOME/vagrant.bin
Verify the file.
file $HOME/vagrant.bin && strings $HOME/vagrant.bin | head -1
output:
/Users/marc/vagrant.bin: data
ssh-rsa
Copy the vagrant.bin file from our Mac to the Cisco IOS XRV device.
scp $HOME/vagrant.bin [email protected]:disk0:
Log in with the vagrant user via SSH to the Cisco IOS XRV device.
ssh [email protected]
Verify the vagrant.bin file location.
dir disk0:/vagrant.bin
output:
Sat Jan  5 22:20:22.470 UTC

Directory of disk0:

4           -rw-  277         Sat Jan  5 22:15:36 2019  vagrant.bin

2377105408 bytes total (1561838592 bytes free)
Import the public key file.
crypto key import authentication rsa disk0:/vagrant.bin
Log out the vagrant user.
exit
Test the SSH connection from our Mac to the Cisco IOS XRv device now using SSH key-based authentication.
ssh -i $HOME/.vagrant.d/insecure_private_key [email protected]
Logged into the Cisco IOS XRv device, we can verify the SSH session is using key-based authentication.
sh ssh
output:
Sat Jan  5 22:25:10.141 UTC
SSH version : Cisco-2.0

id  chan pty     location        state           userid    host                  ver authentication connection type
--------------------------------------------------------------------------------------------------------------------------
Incoming sessions
0   1    vty0    0/0/CPU0        SESSION_OPEN    vagrant   192.168.200.1         v2  rsa-pubkey     Command-Line-Interface

Outgoing sessions
The configuration is set and verified, so log out and move on to the next step.
exit
12. Stop the virtual appliance.
/Applications/VMware\ Fusion.app/Contents/Library/vmrun stop $HOME/Virtual\ Machines.localized/IOS-XRv-613.vmwarevm/IOS-XRv-613.vmx
13. Create the Vagrant box.
Change the current directory.
cd $HOME/Virtual\ Machines.localized/IOS-XRv-613.vmwarevm
Remove generated MAC addresses from the configuration file.
sed -i '' '/generatedAddress/d' IOS-XRv-613.vmx
Remove UUID properties from the configuration file.
sed -i '' '/uuid/d' IOS-XRv-613.vmx
Create the metadata.json file for the VMware provider.
printf '{"provider": "vmware_desktop"}' > metadata.json
List the directory contents to verify the essential files are present.
du -csh *
output:
12K    IOS-XRv-613.nvram
4.0K    IOS-XRv-613.plist
  0B    IOS-XRv-613.vmsd
4.0K    IOS-XRv-613.vmx
4.0K    IOS-XRv-613.vmxf
882M    iosxrv-k9-demo-6.1.3.vmdk
4.0K    metadata.json
272K    vmware.log
882M    total
Package the Vagrant box file with tar.
tar cvzf cisco-ios-xrv-613.box ./*
14. Add the Vagrant box.
From a macOS terminal, add the Vagrant box to our local inventory.
vagrant box add --provider vmware_desktop --name cisco-ios-xrv-613 cisco-ios-xrv-613.box
15. Test it.
From a macOS terminal, create a directory for a test project and change to it.
mkdir $HOME/Documents/test-iosxrv && cd $_
Download an example Vagrantfile.
curl -Lo Vagrantfile https://raw.githubusercontent.com/mweisel/vagrant-vmware-examples/master/cisco-ios-xrv-single-mgmt-int
Validate the Vagrantfile.
vagrant validate
Show the current status of the vagrant machine.
vagrant status
16. Vagrant Up!
vagrant up
The status of the vagrant machine should now be in the running state.
vagrant status
We can connect to the vagrant machine with SSH.
vagrant ssh
We can also connect to the vagrant machine with a console connection (out-of-band management) via telnet.
telnet 127.0.0.1 52001
17. More Vagrant commands
Stop the vagrant machine with the force option.
vagrant halt -f
Destroy (delete) the vagrant machine with the force option.
vagrant destroy -f
18. Next Steps
Build your topology.
Happy Labbing!