Why not add the CSR 1000v to round out our collection of Cisco virtual appliances? Similar to the Cisco Nexus 9000v, each instance of the Cisco CSR 1000v requires a considerable amount of hardware resources to run. Again, I recommend a Mac with at least 16GB of memory and a dual-core CPU if you plan to run more than a single instance.
Ingredients used in this guide:
- macOS Mojave (10.14)
- VMware Fusion 11 Pro
- Vagrant 2.2.3
- VMware provider for Vagrant
- Cisco Cloud Services Router 1000V Series
A valid service contract is required for the download.
Steps
1. Sign in to your Cisco account to download the CSR 1000v Router software.
- The software is available here
- Select the IOS XE Software link
- Select the version from the menu on the left. I will be using Release Denali-16.3.7 MD
- Click the Download button for Cisco CSR1000V IOS XE UNIVERSAL - CRYPTO OVA
- Save the
csr1000v-universalk9.16.03.07.ovafile to the Downloads folder
2. Import the Cisco CSR 1000v OVA file.
- Open the VMware Fusion application
- Menu: File → Import…
- Click the Choose File… button
- Navigate to and select the
csr1000v-universalk9.16.03.07.ovafile in the Downloads folder - Click the Open button
- Click the Continue button
- Click the Continue button to use the default Small deployment option
- Click the Continue button to skip Additional Settings
- Save As:
csr1000v - Click the Save button
- Click the Finish button
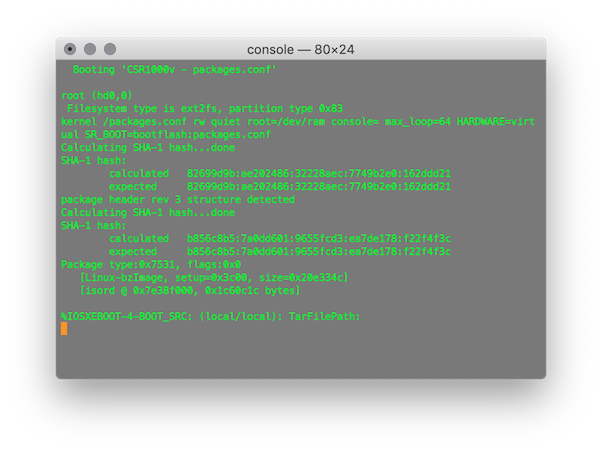
3. Press any key to continue.
The virtual appliance will automatically boot after the OVA import step. From the VMware Fusion console, press any key to continue the boot procedure.
GRUB Loading stage2...
Press any key to continue.
4. Change the console ouput to serial.
From the VMware Fusion console, enter the following commands:
en
conf t
platform console serial
end
copy run start
5. Shutdown the CSR 1000v virtual appliance.
- Menu: Virtual Machine → Shut Down
- Click the Shut Down button
6. Modify the CSR 1000v virtual hardware settings.
- Menu: Virtual Machine → Settings
- Set Network Adapter to Share with my Mac
- Upgrade the VM hardware version to 16 (Compatibility → Upgrade)
- Close the Settings window
- Quit the VMware Fusion application
7. Remove additional network interfaces from the virtual appliance configuration file.
From a macOS terminal, remove Network Adapter 2 and Network Adapter 3.
sed -i '' '/^ethernet[^0]/d' $HOME/Virtual\ Machines.localized/csr1000v.vmwarevm/csr1000v.vmx
The default virtual machine folder (directory) for VMware Fusion 11 is
$HOME/Virtual\ Machines.localized. Upgrades and earlier versions use$HOME/Documents/Virtual\ Machines.localizedas the default.
Verify only Network Adapter remains.
grep '^ethernet' $HOME/Virtual\ Machines.localized/csr1000v.vmwarevm/csr1000v.vmx
output:
ethernet0.present = "TRUE"
ethernet0.virtualDev = "vmxnet3"
ethernet0.connectionType = "nat"
ethernet0.addressType = "generated"
ethernet0.wakeonpcktrcv = "true"
ethernet0.allowguestconnectioncontrol = "true"
ethernet0.pciSlotNumber = "160"
ethernet0.generatedAddress = "00:0C:29:DD:0C:DE"
ethernet0.generatedAddressOffset = "0"
8. Add a custom serial port (for management via console connection).
From a macOS terminal, append a serial port device to the virtual appliance configuration file.
printf 'serial0.present = "TRUE"\nserial0.yieldOnMsrRead = "TRUE"\nserial0.fileType = "network"\nserial0.fileName = "telnet://127.0.0.1:52099"\n' >> $HOME/Virtual\ Machines.localized/csr1000v.vmwarevm/csr1000v.vmx
Verify the component has been added.
tail -4 $HOME/Virtual\ Machines.localized/csr1000v.vmwarevm/csr1000v.vmx
output:
serial0.present = "TRUE"
serial0.yieldOnMsrRead = "TRUE"
serial0.fileType = "network"
serial0.fileName = "telnet://127.0.0.1:52099"
9. Remove the IDE secondary slave (ide1:1) device.
From a macOS terminal:
sed -i '' '/^ide1:1/d' $HOME/Virtual\ Machines.localized/csr1000v.vmwarevm/csr1000v.vmx
Verify the component has been removed.
grep '^ide1' $HOME/Virtual\ Machines.localized/csr1000v.vmwarevm/csr1000v.vmx
output:
ide1:0.fileName = "csr1000v-file1.iso"
ide1:0.clientDevice = "FALSE"
ide1:0.present = "TRUE"
ide1:0.deviceType = "cdrom-image"
ide1:0.autodetect = "TRUE"
ide1:0.startConnected = "TRUE"
ide1:0.allowguestconnectioncontrol = "true"
10. Start the virtual appliance.
From a macOS terminal, start the virtual appliance with the vmrun command using the headless parameter.
/Applications/VMware\ Fusion.app/Contents/Library/vmrun start $HOME/Virtual\ Machines.localized/csr1000v.vmwarevm/csr1000v.vmx nogui
11. Initiate a console connection (via telnet) to the CSR 1000v virtual appliance.
Telnet has been removed from macOS High Sierra and later. Refer to How to Get Telnet for MacOS in Mojave or High Sierra .
Open a separate macOS terminal window (or tab) and enter the following command:
telnet 127.0.0.1 52099
12. Set a baseline configuration for the Vagrant box.
Create the vagrant user.
en
conf t
username vagrant privilege 15 secret vagrant
Enable AAA and define AAA method lists.
aaa new-model
aaa authentication login VTYS local
aaa authorization exec VTYS local
Disable DNS lookups.
no ip domain-lookup
Enable Cisco IOS.sh .
shell processing full
Configure the primary terminal line.
line con 0
 privilege level 15
 exec-timeout 0 0
 logging synchronous
 exit
Configure the virtual terminal lines.
line vty 0 4
 exec-timeout 0 0
 logging synchronous
 login authentication VTYS
 authorization exec VTYS
 transport input ssh
 exit
Configure the management interface.
int g1
 shut
 ip addr dhcp
 no cdp enable
 no shut
 exit
Configure SSH.
ip domain name example.com
ip ssh version 2
ip ssh rsa keypair-name SSHKEYS
crypto key generate rsa usage-keys label SSHKEYS modulus 1024
ip scp server enable
ip ssh pubkey-chain
 username vagrant
  key-hash ssh-rsa DD3BB82E850406E9ABFFA80AC0046ED6
  exit
 end
Save the running configuration to local NVRAM.
copy run start
13. Stop the virtual appliance.
Stop the virtual appliance from the original macOS terminal window (or tab).
/Applications/VMware\ Fusion.app/Contents/Library/vmrun stop $HOME/Virtual\ Machines.localized/csr1000v.vmwarevm/csr1000v.vmx
14. Create the Vagrant box.
Change the current directory.
cd $HOME/Virtual\ Machines.localized/csr1000v.vmwarevm
Remove generated MAC addresses from the CSR configuration file.
sed -i '' '/generatedAddress/d' csr1000v.vmx
Remove UUID properties from the CSR configuration file.
sed -i '' '/uuid/d' csr1000v.vmx
Create the metadata.json file for the VMware provider.
printf '{"provider": "vmware_desktop"}' > metadata.json
List the directory contents to verify the essential files are present.
du -csh *
output:
1.2G csr1000v-disk1.vmdk
361M csr1000v-file1.iso
4.0K csr1000v.plist
  0B csr1000v.vmsd
4.0K csr1000v.vmx
4.0K csr1000v.vmxf
4.0K metadata.json
 12K nvram
4.0K startMenu.plist
328K vmware-0.log
276K vmware.log
1.6G total
Package the Vagrant box file with tar.
tar cvzf cisco-csr-1000v.box ./*
15. Add the Vagrant box.
Download an example Box Metadata file.
curl -Lo box-meta.json https://raw.githubusercontent.com/mweisel/vagrant-vmware-examples/master/cisco-csr-1kv-box-meta.json
Display the file content.
cat box-meta.json
output:
{
  "name": "cisco-csr-1000v",
  "description": "This box contains Cisco Cloud Services Router (CSR) 1000v.",
  "versions": [
    {
      "version": "16.03.07",
      "providers": [
        {
          "name": "vmware_desktop",
          "url": "file://fq_path/cisco-csr-1000v.box"
        }
      ]
    }
  ]
}
The file path to the cisco-csr-1000v.box file will differ from mine. We can simply replace the fq_path token, with our specific file path, using a combination of sed and pwd.
sed -i '' "s|fq_path|$(pwd)|" box-meta.json
Verify the modification.
grep url box-meta.json | sed 's/^ *//'
output:
"url": "file:///Users/marc/Virtual Machines.localized/csr1000v.vmwarevm/cisco-csr-1000v.box"
Also, make sure to modify the Cisco CSR 1000v version value if need be. For example, if you have the latest Gibraltar release:
sed -i '' 's/16.03.07/16.10.1b/' box-meta.json
Verify the modification.
grep -w version box-meta.json | sed 's/^ *//'
output:
"version": "16.10.1b",
Add the Vagrant box to the local inventory.
vagrant box add box-meta.json
Verify the box is now listed.
vagrant box list | grep -i csr
output:
cisco-csr-1000v (vmware_desktop, 16.03.07)
16. Test it.
Create a directory for a test project and change to it.
mkdir $HOME/Documents/test-csr-1000v && cd $_
Download an example Vagrantfile.
curl -Lo Vagrantfile https://raw.githubusercontent.com/mweisel/vagrant-vmware-examples/master/cisco-csr-1kv-single-mgmt-int
Validate the Vagrantfile.
vagrant validate
Show the current status of the vagrant machine.
vagrant status
17. Vagrant Up!
vagrant up
The status of the vagrant machine should now be in the running state.
vagrant status
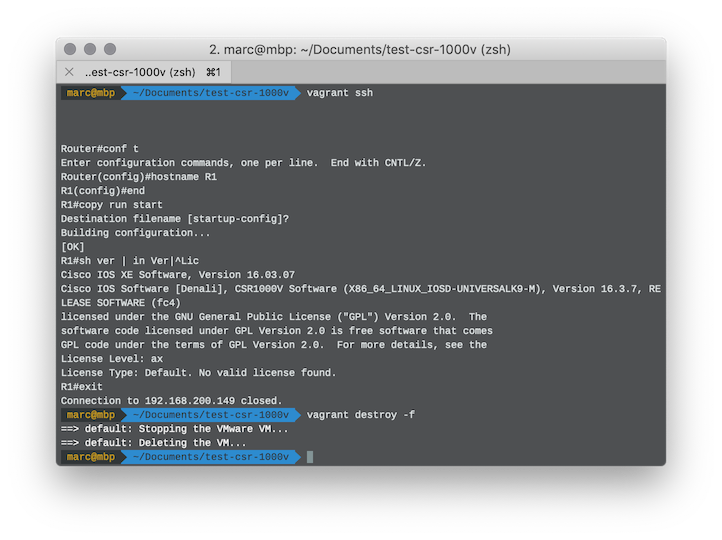
We can connect to the vagrant machine with SSH.
vagrant ssh
We can also connect to the vagrant machine with a console connection (out-of-band management) via telnet.
telnet 127.0.0.1 52001
18. More Vagrant commands
Stop the vagrant machine with the force option.
vagrant halt -f
Destroy (delete) the vagrant machine with the force option.
vagrant destroy -f
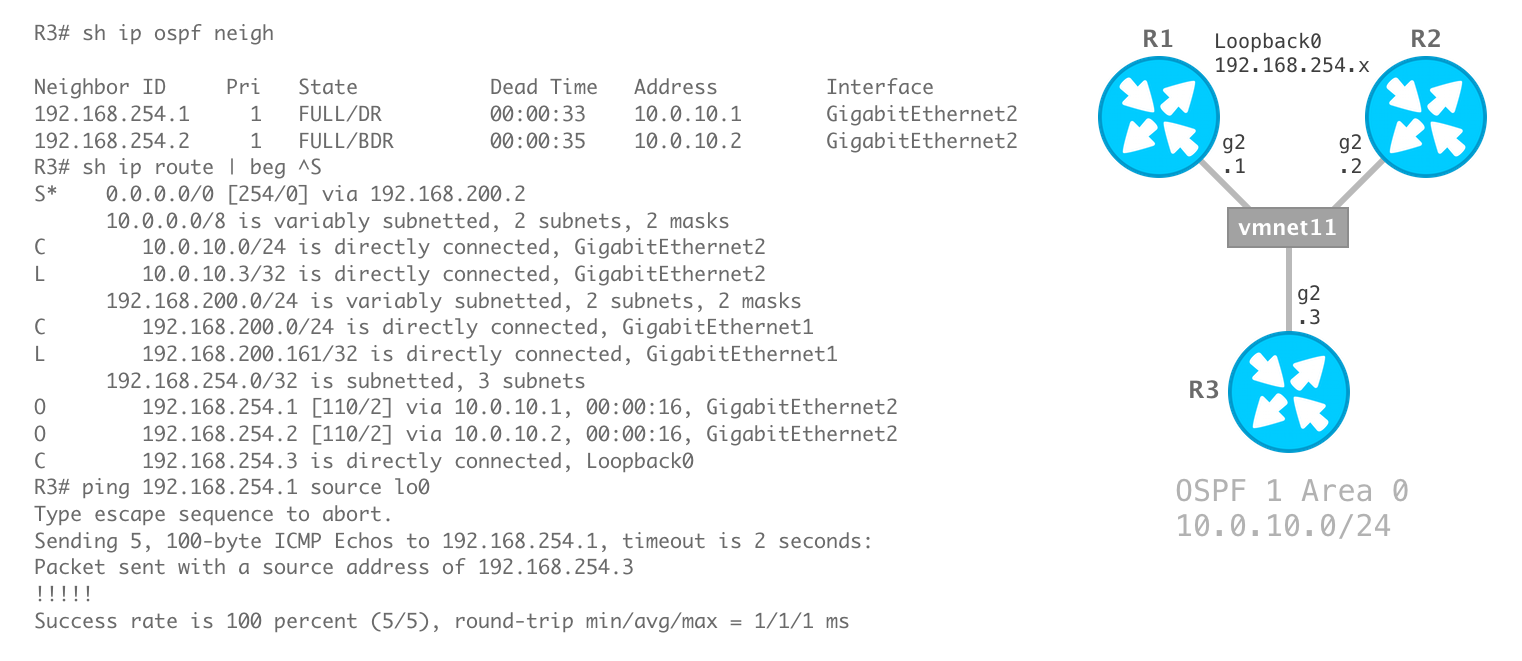
19. Next Steps
Build your topology.
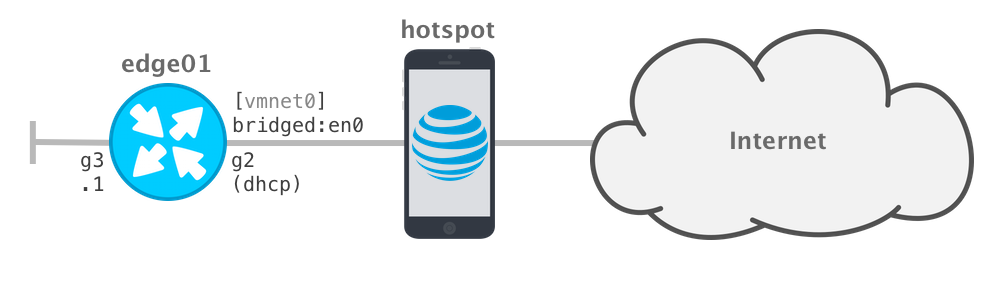
Pick your network automation tool.